Category Archives: Uncategorized

Friendess BCS100 Fiber Laser Capacitive Height Amplifier

THIS IS UNTESTED CURRENTLY – DO NOT PUT THIS INTO USE WITHOUT VETTING THE INFORMATION YOURSELF!

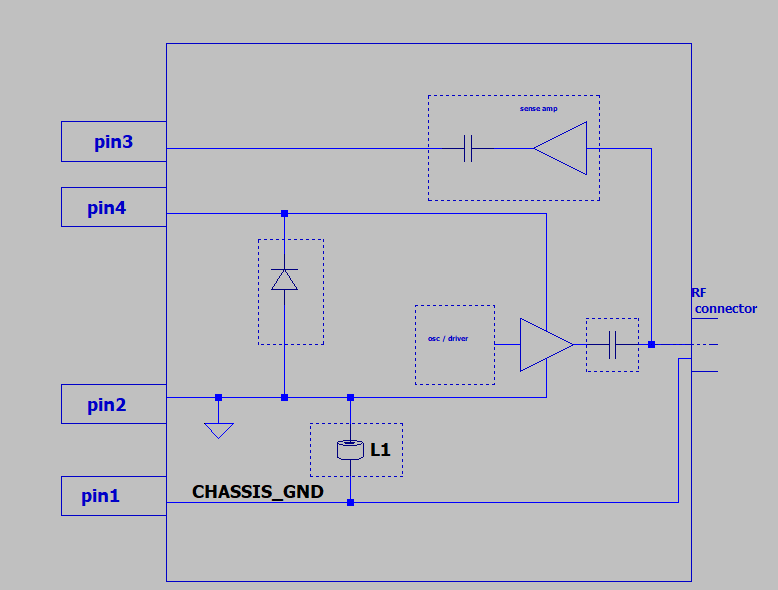
We purchased a BCS100 fiber laser amplifier despite it not having a documented pinout so we can connect it up to LinuxCNC and use it for height control on a DIY fiber laser build. So far here’s our best guess at an electrical schematic:

Thanks Ken for your expertise as always!

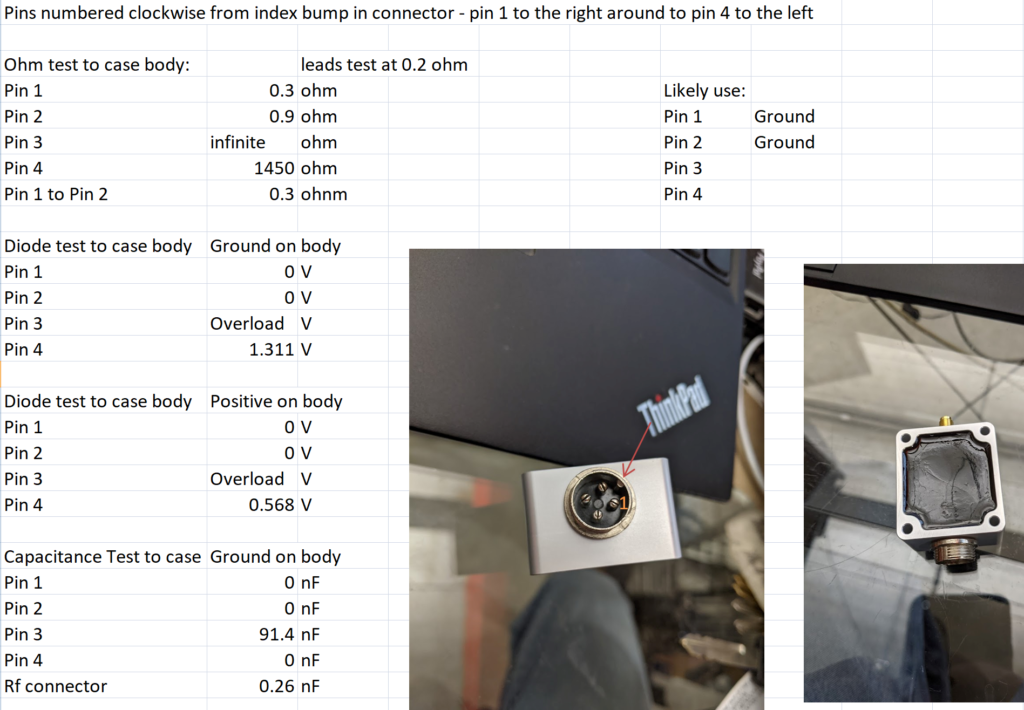
Based on some preliminary tests:

Note the arrow aimed at the connector index, pin 1 to the right

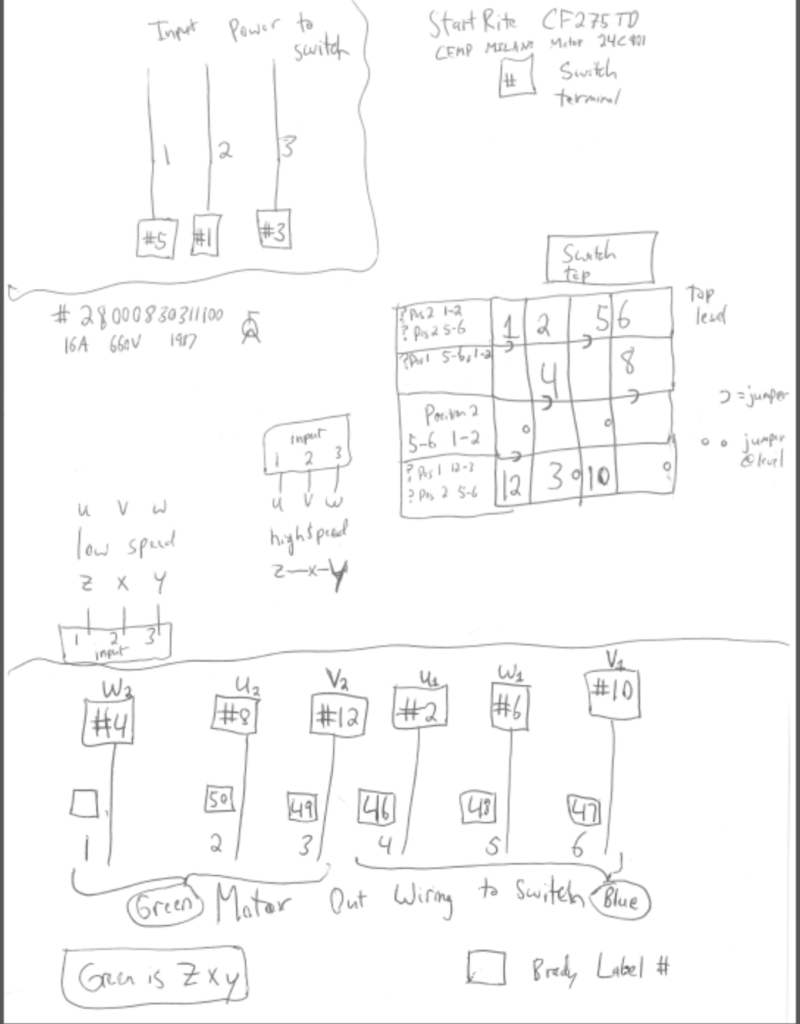
Startrite CF275TD Cold Saw Wiring Schematic

If you have additional information on this saw please contact me and I’ll post it here as well, there isn’t a lot of information out there. I had to debug the electrical to figure out why our high speed operation wasn’t working. It turned out to be a broken wire that got pinched under the ground screw in the motor housing but before I figured that out I traced the full schematic. Hopefully it’s of some benefit to someone else.

Keyworks: Startrite CF275TD Motor CEMP MILANO 24C901 Drum Barrel Switch 28000830311100

Piranha P50 Pedal Pinout

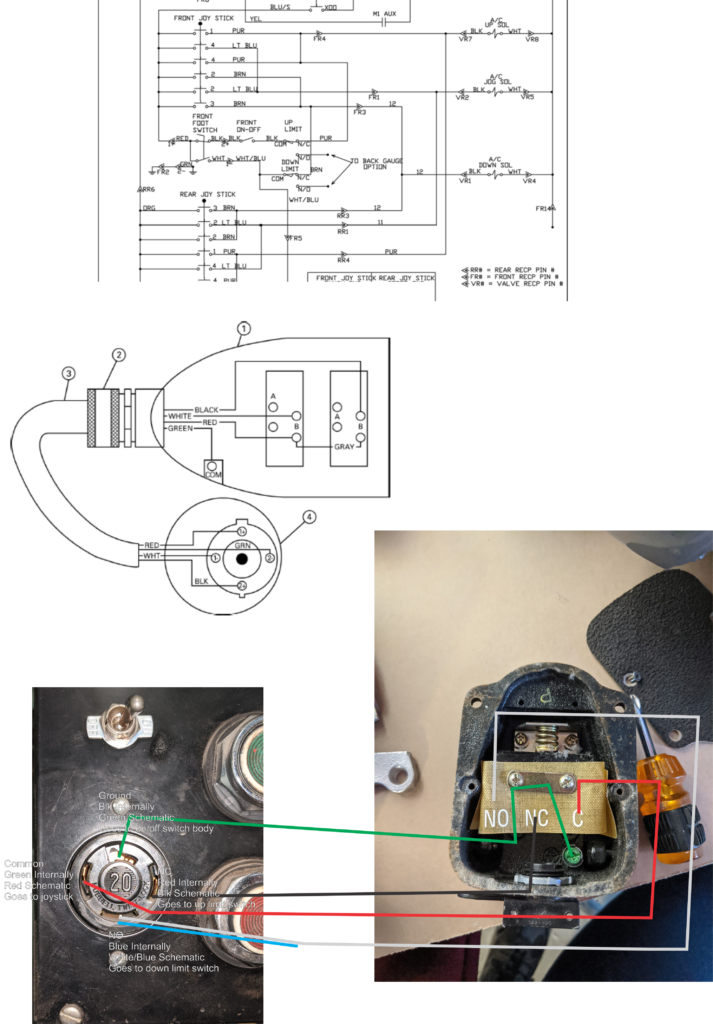
We have a Piranha P50 ironworker and we wanted to get a pedal working to augment the joystick controls. Piranha is nice enough to release real machine information including full electrical schematics and information but when we went to implement a pedal it wouldn’t work. Our pedal plug didn’t match the pictures in the instructions, but our wiring appeared the same. Long story short, after pinning out the wires and tracing things around it turns out the schematic wire colors don’t match with how our machine was built.

The other thing worth noting is the manual refers to the 3 position pedal, the supports down, up, and neutral (stopped), we only have a 2 position pedal (single throw, double pole momentary switch) so we wanted the ram to either be running down to the limit or up to the limit at all times.

You might have to click on or download the picture to have a better sense of the wiring. Please make sure you check your machine, it might not be wired the same at all. Also read and understand all of the warnings associated with operating the Piranha press with a pedal, the machine *will* move unexpectedly at startup if the pedal is connected and switch is not off.

RepRap gcode using MeshCAM

Warning – this post was sitting in the drafts, I don’t know how helpful it’ll be but it’s been sitting for 5 years – may as well release the information and hope it helps someone.

***

If anyone out there is running the RepRap / Makerbot gcode intrepreter for a CNC dremel / router / etc and is trying to use MeshCAM here’s some instructions:

Use MeshCAM as usual, but you’ll want to use this post script (you probably don’t actually need to print all of the XYZ commands when you’re not moving them, but it doesn’t hurt to do it, hence the @ rather than #):
; MeshCAM config
; This config is the basis for the minimum
; gcode output. If you're looking for
; the shortest output file then this is the config
; to start with. Also show how to integrate CutViewer config into
; the output.
;
; 2/29/04 Changed comments to be enclosed by () rather than start with ;
; Added CutViewer config output
; 5/13/04 Added toolchange gcode
; 2/12/05 Changed name and added units
; 3/17/05 Changed stock definition to use CUTVIEWERSTOCK variable
; 5/19/05 Removed feedrate command for rapid moves
; 5/25/05 Added dummy tool for CutViewer
; 6/27/05 Changed the formats to 1.4 to get 4 decimal places of accuracy
;
DESCRIPTION = "RepRap GCode-MM(*.nc)"
FILE_EXTENSION = "nc"
UNITS = MM
;Feeds
FORMAT = [F|@|F|1.1]
;Moves
FORMAT = [X|@|X|1.4]
FORMAT = [Y|@|Y|1.4]
FORMAT = [Z|@|Z|1.4]
;
START = "%"
START = "(FILENAME: [FILENAME])"
; The following is a dummy tool to keep CutViewer from generating an error when G20 is called without a tool
START = "(TOOL/MILL,0.1,0.05,0.000,0)"
START = "G21 ;Metric is good"
START = "([CUTVIEWERSTOCK])"
START = "G90 ;Absolute Positioning"
;
FIRST_RAPID_RATE_MOVE = "G0 [X] [Y] [Z] [F]"
RAPID_RATE_MOVE = "G0 [X] [Y] [Z]"
;
FIRST_FEED_RATE_MOVE = "G1 [X] [Y] [Z] [F]"
FEED_RATE_MOVE = "G1 [X] [Y] [Z]"
;
END = "(END)"
END = "(OF PROGRAM)"

Here’s a text version, make sure to rename the extension to .con and put it in your posts folder in the MeshCAM installation directory

RepRap gcode-MM

Next up, open your STL/etc file, set up your tooling, and then the important part:

Your RepRap will not allow you to cross the Z axis, so when MeshCAM creates the gcode and moves the position to positive Z to clear the work surface, your RepRap will toss this command and destruction will ensue. . .  Figure out your retract height, in my case I set it to 2.5mm so I can easily remember it.  You want to take this number, then set your stock size to fit geometry (or as needed), but make sure you add your retract height to the stock height and put it in the Z Position.

For example, I have a 5.08mm block I’m machining, with a 2.5mm retract height.  So I would define my Z Position as 5.08+2.50 or 7.58mm  This will result in your retraction remaining less than 0mm and the machine will actually retract away from the workpiece.
Pollution and Our Planet

Ran across this photo series the other day and I’ve been thinking about the images and repercussions for a while – have a look. This goes a long way to show how minimizing pollution in the US and other major developed countries will have little impact on the overall effect of pollution/emissions on a global scale. . .

Related to this, and very much worth the time to watch, is this video on our planet

And while we’re on the topic, you should stop by YouTube and check out these videos that will really put things into perspective.

Snag Films

Have to say this is an awesome idea!  Snag Films allows you to watch documentaries streaming on demand, the price you pay is nothing but the occasional commercial. Looks like they’re just getting started so I’m sure they’ll end up with a different revenue model down the road, but for now head on over and enjoy free movies!

I’m hearing the groans now, “it’s just documentaries, who wants to watch that crap. . .”, so no, you won’t find action films or anything on there, but otherwise there are some excellent films if you’re in the mood to open your eyes to the rest of the world 🙂

Introduction to Arduino Powerpoint

If anyone else out there is planning on presenting an Introduction to Arduino in the near future feel free to build off my presentation here.  I’ve tried to cite anywhere that the images came from, keeping in mind that I was using the images in an educational setting which has magic rules for fair use.

Fair use explicitly allows use of copyrighted materials for educational purposes such as criticism, comment, news reporting, teaching, scholarship, and research. Rather than listing exact limits of fair use, copyright law provides four standards for determination of the fair use exemption:

Let me know if this helps you out or if you have an glaring complaints 🙂

DOWNLOAD:

Introduction to Arduino Presentation

Presentation and demo (not included) given at the 2009 Enlight student organization kickoff meeting at the University of Wisconsin – Madison

Creative Commons License
This work is licensed under a Creative Commons Attribution-Noncommercial-Share Alike 3.0 United States License.

Added Tear Downs to Site!

I’ve been taking apart just about anything I can get my hands on for a long time now, I finally had a few minutes tonight to get some of the pictures online over on the teardown page.  I’ll be figuring out a more scripted approach at this shortly, but for now you can at least catch a few pictures and hopefully this will help someone out there when they’re trying to figure out how to reassemble their junk!

10 Minute Headlight Repair – Remove Headlight Haze

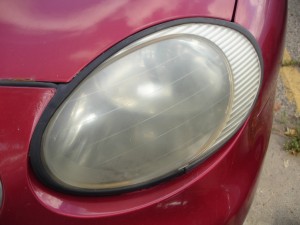
After watching the headlights on the 1997 Ford Taurus grow progressively more and more hazy until night driving was impacted we finally decided to invest in the $10 headlight restoration / polish kit which supposedly would restore the headlights to their original haze free condition. I’m certainly a skeptic with these products, as more often than not they’re just a scam. . .

Ford Taurus Hazy Headlight before Repair

Ford Taurus Hazy Headlight before Repair

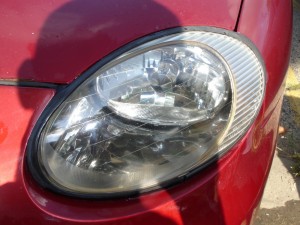
So I got out my drill, cracked open the headlight restoration kit and . . . READ THE DIRECTIONS! The kit basically included 1 arbor to mount whichever pad you were using on it, 2 ~360 grit foam backed sanding discs, and a single foam pad for use with the polishing compound. I of course, having read the directions, figured we were suffering from a severe case of hazing, so I opted for first using plenty of water and the sanding discs to start things off. The second I touched the sanding disc to the headlight I realized my mistake and now deep scratches which would now require extra buffing time.  After about 3 seconds of buffing and continuously moving you can almost immediately see results:

Ford Taurus Headlight after Repair

Ford Taurus Headlight after Repair

Recommendations on Repairing your Own Headlights:

  • Carefully clean your headlights before beginning, otherwise you’ll grind the dead bugs into your headlights and have more of a mess to repair!
  • Use the foam pad and polishing compound liberally, keep moving so you don’t burn (overheat) the headlights in spots
  • You don’t need to be running the drill full throttle, it takes very little pressure and very little speed, take it easy
  • Finally, have water handy and occasionally rinse the whole light off to observe any progress and remove anything that’s on the surface so you don’t grind it into the headlight

Finally,  if you’re a DIYer, you can likely perform the same repair with toothpaste and a foam pad glued to a drill/dremel/buffer arbor.  Better yet you can likely buy some polycarbonate polish for cheap from a plastics store (industrial) near your home.  ALWAYS make sure you test your solution on a small unimportant corner of the light to see what’s going to happen before going right to the center of your lense cover and potentially hazing a bad spot in the middle, and ultimately what’s $10 to know you’re doing it right?

You can purchase the kit I used from your local Harbor Freight store or click this link and when you’re done review your Harbor Freight purchases here!

Steam Error

If you get this steam error:
SteamStartup() failed: SteamStartup(0xf,0x0012E584) failed with error 1: WSAStartup() for 2.0 returned error code 10091
Just restart your machine, I’m not sure what caused it and I couldn’t find anything on the internet (hence the post) but restarting fixed it.